-2.png?width=567&height=119&name=iScribe_Logo%20(2)-2.png)
1. Getting Started with Secretarial Access
- Use the email address linked to your Secretarial Access invitation to create your i-scribe account.
- Once your account is created, log in to access the patient and document details that your clinician has approved for you.
2. Managing Patient Documents
After logging in, you’ll see details for each listed patient, including:
- Patient Name and DOB
- Clinician Name (who approved the documents)
- Consult Date and Time
Below each patient’s name are the documents the clinician created.
- Blue Documents: These need to be copied (Image 1). To copy, click the document name.
- Once copied, the document name will turn white (Image 2), and the check box will be ticked.
- When all pending documents have been copied, the Status Box will also be ticked.
- If you copy a blue document in error, simply click the document name, and it will revert from copied to un-copied.

Image 1: Secretarial Access interface, showing a patient with two pending documents, and instructions for these.

Image 2: The same patient, with both documents copied and completed. The status box is now ticked.
3. Filtering and Searching for Patients
To locate specific patients quickly:
Use the Filter Patient box in the top right corner to search by name.
You can also filter patients by:
- Clinician
- Consult Date
- Status
- Available: Blue documents are waiting to be copied.
- Completed: All documents for this patient have been copied
4. Viewing Consult Details
If you need to see more information about a consult:
- Click View Consult next to the patient’s name.
- Here, you can confirm patient identifiers and review the transcript.
Note: These documents cannot be edited by secretarial access users.
5. Adding Additional Secretaries From Secretary View
- If a secretary has "Admin Access" they can invite other secretaries.
- "Admin Access" can be changed in the "Settings" of the Clinician's Account.
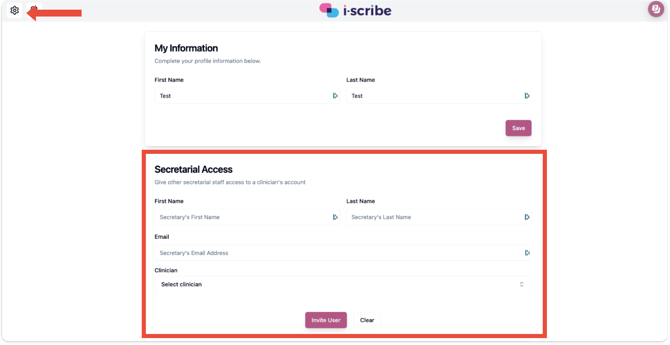
- To do this (referring to the image below) from the secretary view:
- Click the settings cog (shown by the red arrow on the top left)
- Enter the secretary information and invite user (shown by the red box).